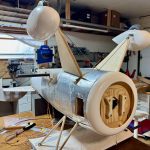

Top Center Wing Section
Straightforward build but the video shows me starting then stopped because I forgot to shim the rear spar. That could have been bad. This section of the wing will remain attached to the fuselage at all times. Only the wing panels will be removed for travel. After inserting the spar tube and sheeting the top surface it was time for lithoplate to simulate the fuel tanks. Where does one find lithoplate these days? Well, you can still purchase it online but I did not need 50, or 100, sheets of it. Did a bit of Google and found an old school offset print shop in St Charles, near Lindenwood.
So many printers have moved past this style of printing. In fact, the gal at the counter did not even recognize the term lithoplate; so she took me to meet an older gentleman who owned the shop. His shortened thumb proved he had his fingers in the rollers! He was gracious and we ventured into the recesses of his shop storage room. Had to move stuff to get to the actual door. He handed me some used sheets and asked if this is what I needed. Yep. How much do you need? A bit more than this. He reached in and grabbed a bunch and sent me on my way. I ended up with about 20 used sheets of lithoplate. Woo!
I applied the lithoplate to the balsa sheeting with 3M spray adhesive. I used more plate on the roots of the upper wing panels where the auxiliary fuel tanks are located; should your Waco be so equipped. Simulated rivets will be coming soon.
Two of the pictures show a trial fit of the cabanes. Looking for -2 degrees incidence then braze the connectors onto the cabane wires. The kit includes pre-shaped balsa to wrap the wires to give the cabanas their scale shape.